


Track machine learning experiments with MLflow on Amazon SageMaker using Snowflake integration
In this post, we demonstrate how to integrate Amazon SageMaker managed MLflow as a central repository to log these experiments and provide a unified system for monitoring their progress.
A user can conduct machine learning (ML) data experiments in data environments, such as Snowflake, using the Snowpark library. However, tracking these experiments across diverse environments can be challenging due to the difficulty in maintaining a central repository to monitor experiment metadata, parameters, hyperparameters, models, results, and other pertinent information. In this post, we demonstrate how to integrate Amazon SageMaker managed MLflow as a central repository to log these experiments and provide a unified system for monitoring their progress.
Amazon SageMaker managed MLflow offers fully managed services for experiment tracking, model packaging, and model registry. The SageMaker Model Registry streamlines model versioning and deployment, facilitating seamless transitions from development to production. Additionally, integration with Amazon S3, AWS Glue, and SageMaker Feature Store enhances data management and model traceability. The key benefits of using MLflow with SageMaker are that it allows organizations to standardize ML workflows, improve collaboration, and accelerate artificial intelligence (AI)/ML adoption with a more secure and scalable infrastructure. In this post, we show how to integrate Amazon SageMaker managed MLflow with Snowflake.
Snowpark allows Python, Scala, or Java to create custom data pipelines for efficient data manipulation and preparation when storing training data in Snowflake. Users can conduct experiments in Snowpark and track them in Amazon SageMaker managed MLflow. This integration allows data scientists to run transformations and feature engineering in Snowflake and utilise the managed infrastructure within SageMaker for training and deployment, facilitating a more seamless workflow orchestration and more secure data handling.
Solution overview
The integration leverages Snowpark for Python, a client-side library that allows Python code to interact with Snowflake from Python kernels, such as SageMaker’s Jupyter notebooks. One workflow could include data preparation in Snowflake, along with feature engineering and model training within Snowpark. Amazon SageMaker managed MLflow can then be used for experiment tracking and model registry integrated with the capabilities of SageMaker.
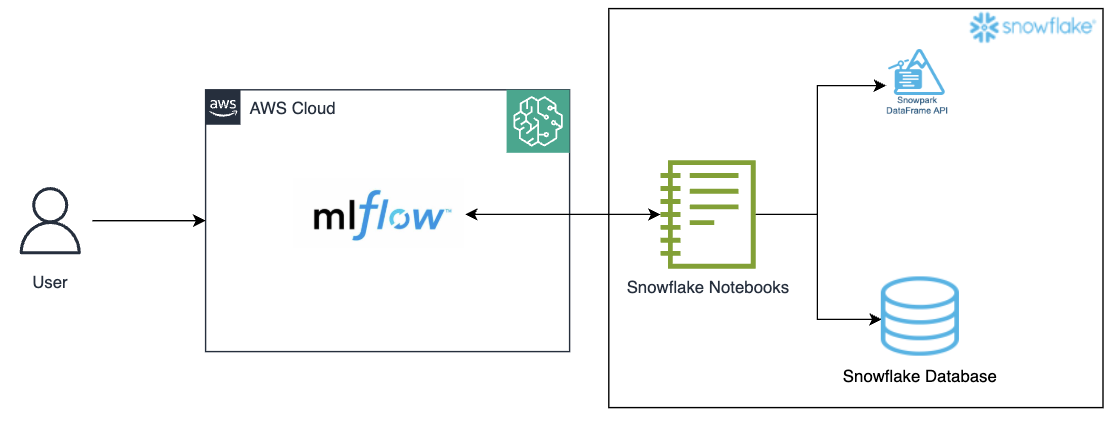
Figure 1: Architecture diagram
Capture key details with MLflow Tracking
MLflow Tracking is important in the integration between SageMaker, Snowpark, and Snowflake by providing a centralized environment for logging and managing the entire machine learning lifecycle. As Snowpark processes data from Snowflake and trains models, MLflow Tracking can be used to capture key details including model parameters, hyperparameters, metrics, and artifacts. This allows data scientists to monitor experiments, compare different model versions, and verify reproducibility. With MLflow’s versioning and logging capabilities, teams can seamlessly trace the results back to the specific dataset and transformations used, making it simpler to track the performance of models over time and maintain a transparent and efficient ML workflow.
This approach offers several benefits. It allows for scalable and managed MLflow tracker in SageMaker, while utilizing the processing capabilities of Snowpark for model inference within the Snowflake environment, creating a unified data system. The workflow remains within the Snowflake environment, which enhances data security and governance. Additionally, this setup helps to reduce cost by utilizing the elastic compute power of Snowflake for inference without maintaining a separate infrastructure for model serving.
Prerequisites
Create/configure the following resources and confirm access to the aforementioned resources prior to establishing Amazon SageMaker MLflow:
- A Snowflake account
- An S3 bucket to track experiments in MLflow
- An Amazon SageMaker Studio account
- An AWS Identity and Access Management (IAM) role that is an Amazon SageMaker Domain Execution Role in the AWS account.
- A new user with permission to access the S3 bucket created above; follow these steps.
- Confirm access to an AWS account through the AWS Management Console and AWS Command Line Interface (AWS CLI). The AWS Identity and Access Management (IAM) user must have permissions to make the necessary AWS service calls and manage AWS resources mentioned in this post. While providing permissions to the IAM user, follow the principle of least-privilege.
- Configure access to the Amazon S3 bucket created above following these steps.
- Follow these steps to set up external access for Snowflake Notebooks.
Steps to call SageMaker’s MLflow Tracking Server from Snowflake
We now establish the Snowflake environment and connect it to the Amazon SageMaker MLflow Tracking Server that we previously set up.
- Follow these steps to create an Amazon SageMaker Managed MLflow Tracking Server in Amazon SageMaker Studio.
- Log in to Snowflake as an admin user.
- Create a new Notebook in Snowflake
- Projects > Notebooks > +Notebook
- Change role to a non-admin role
- Give a name, select a database (DB), schema, warehouse, and select ‘Run on container’

- Notebook settings > External access> toggle on to allow all integration
- Install libraries
!pip install sagemaker-mlflow
- Run the MLflow code, by replacing the arn value from the below code:

Figure 3: Install sagemaker-mlflow library
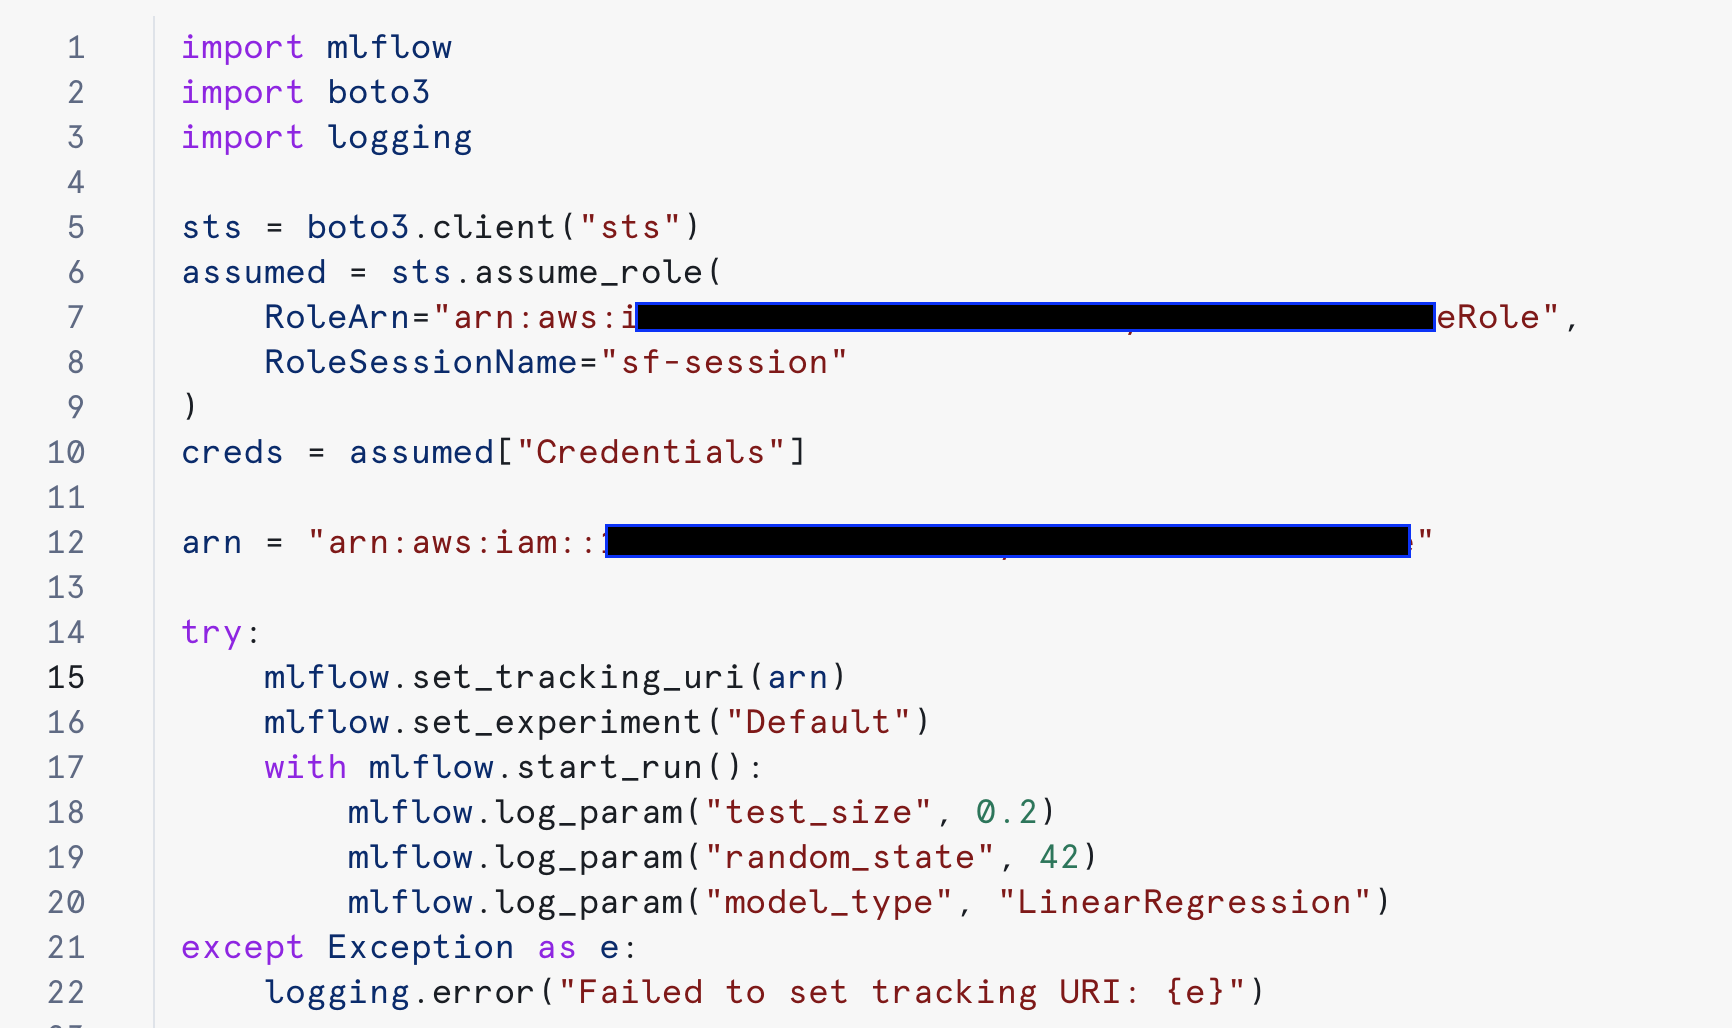
Figure 4: Configure MLflow and do experiments.
On a successful run, the experiment can be tracked on Amazon SageMaker:
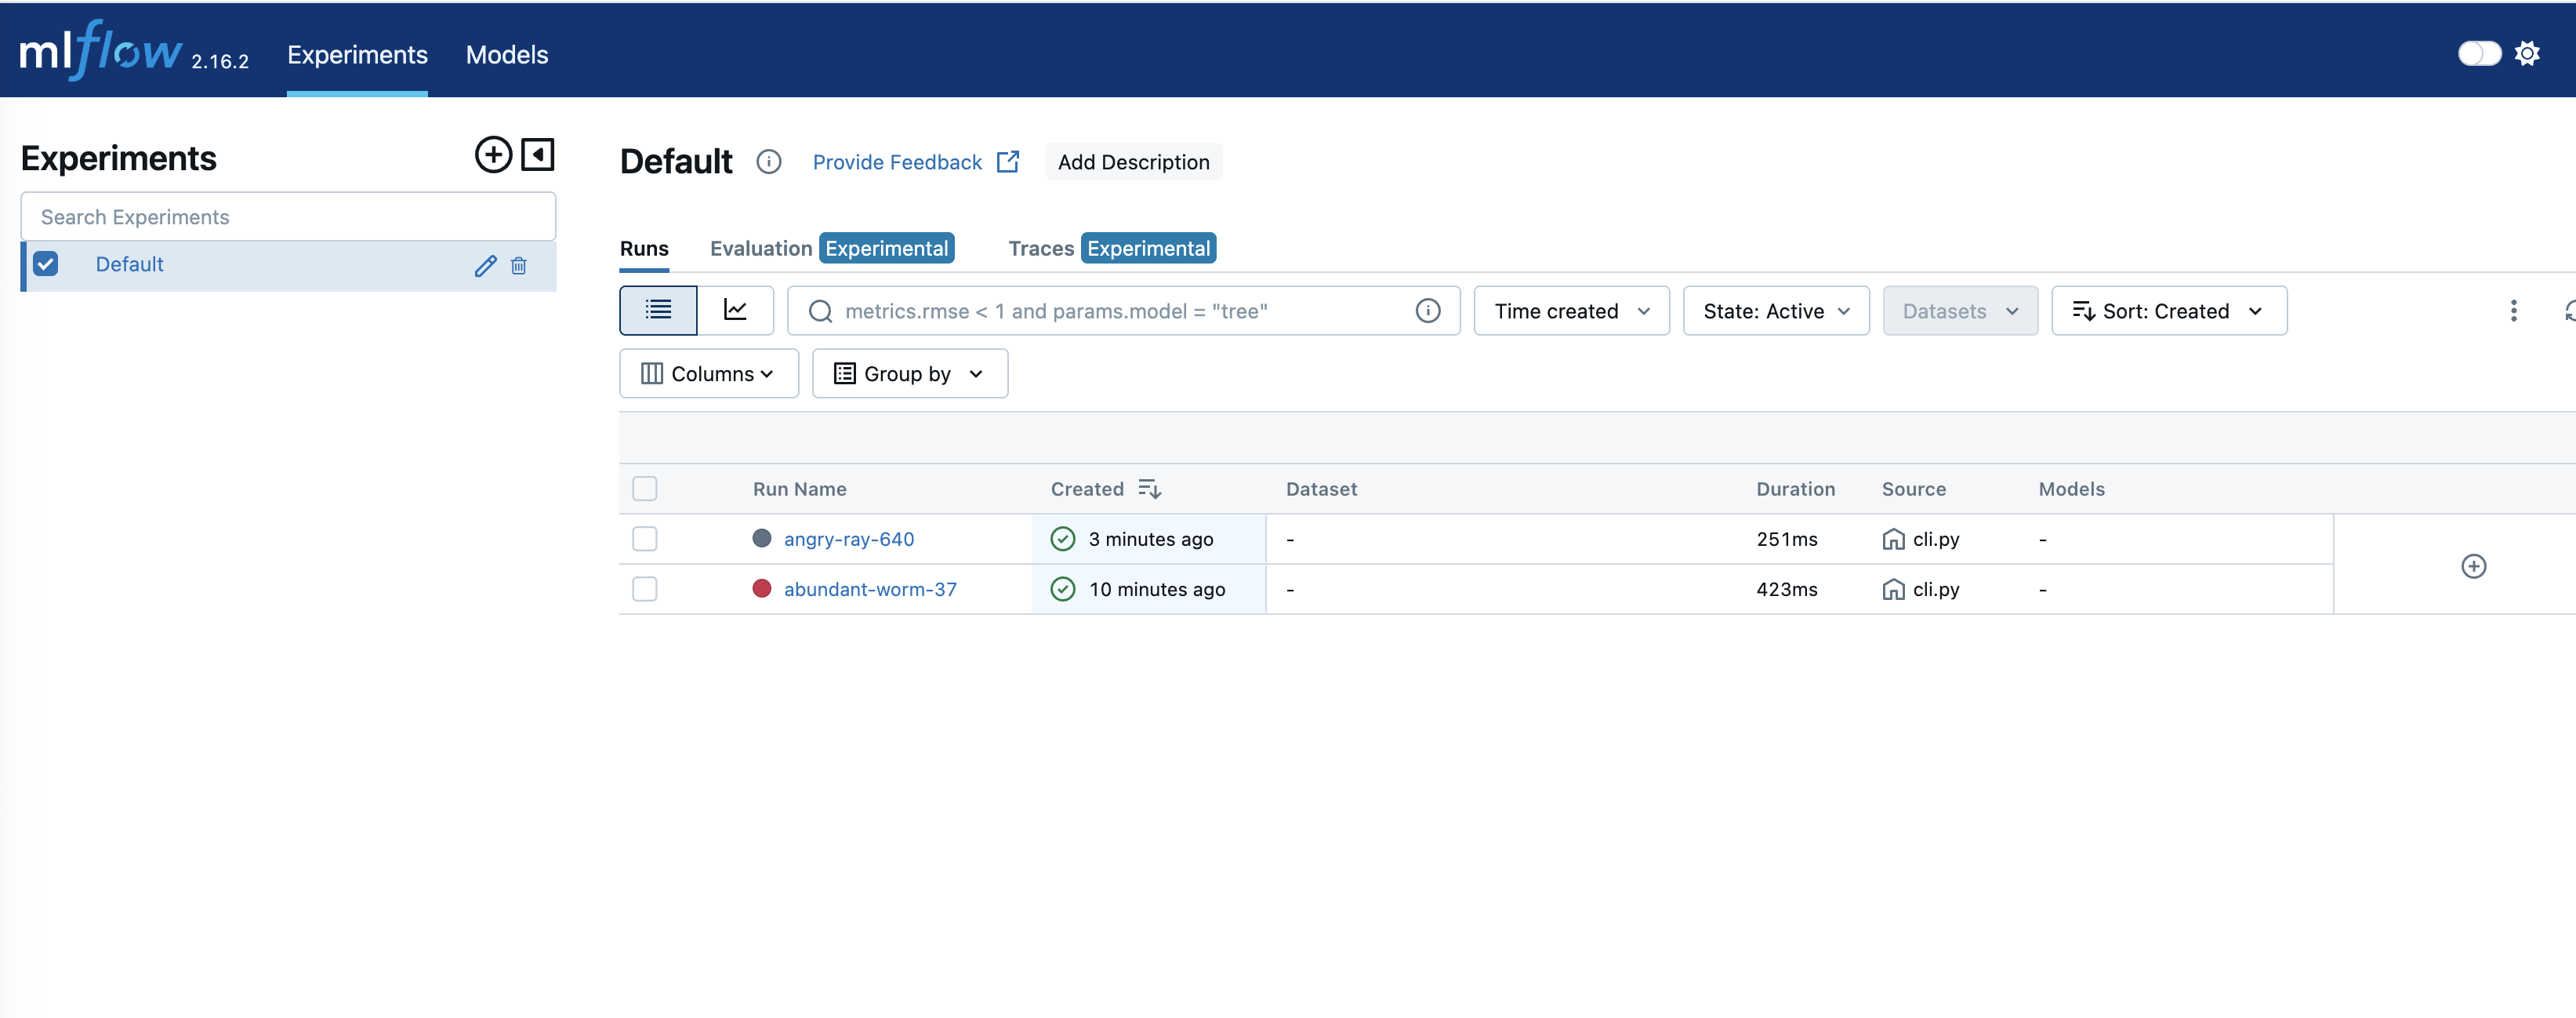
Figure 5: Track experiments in SageMaker MLflow
To get into details of an experiment, click on the respective “Run name:”
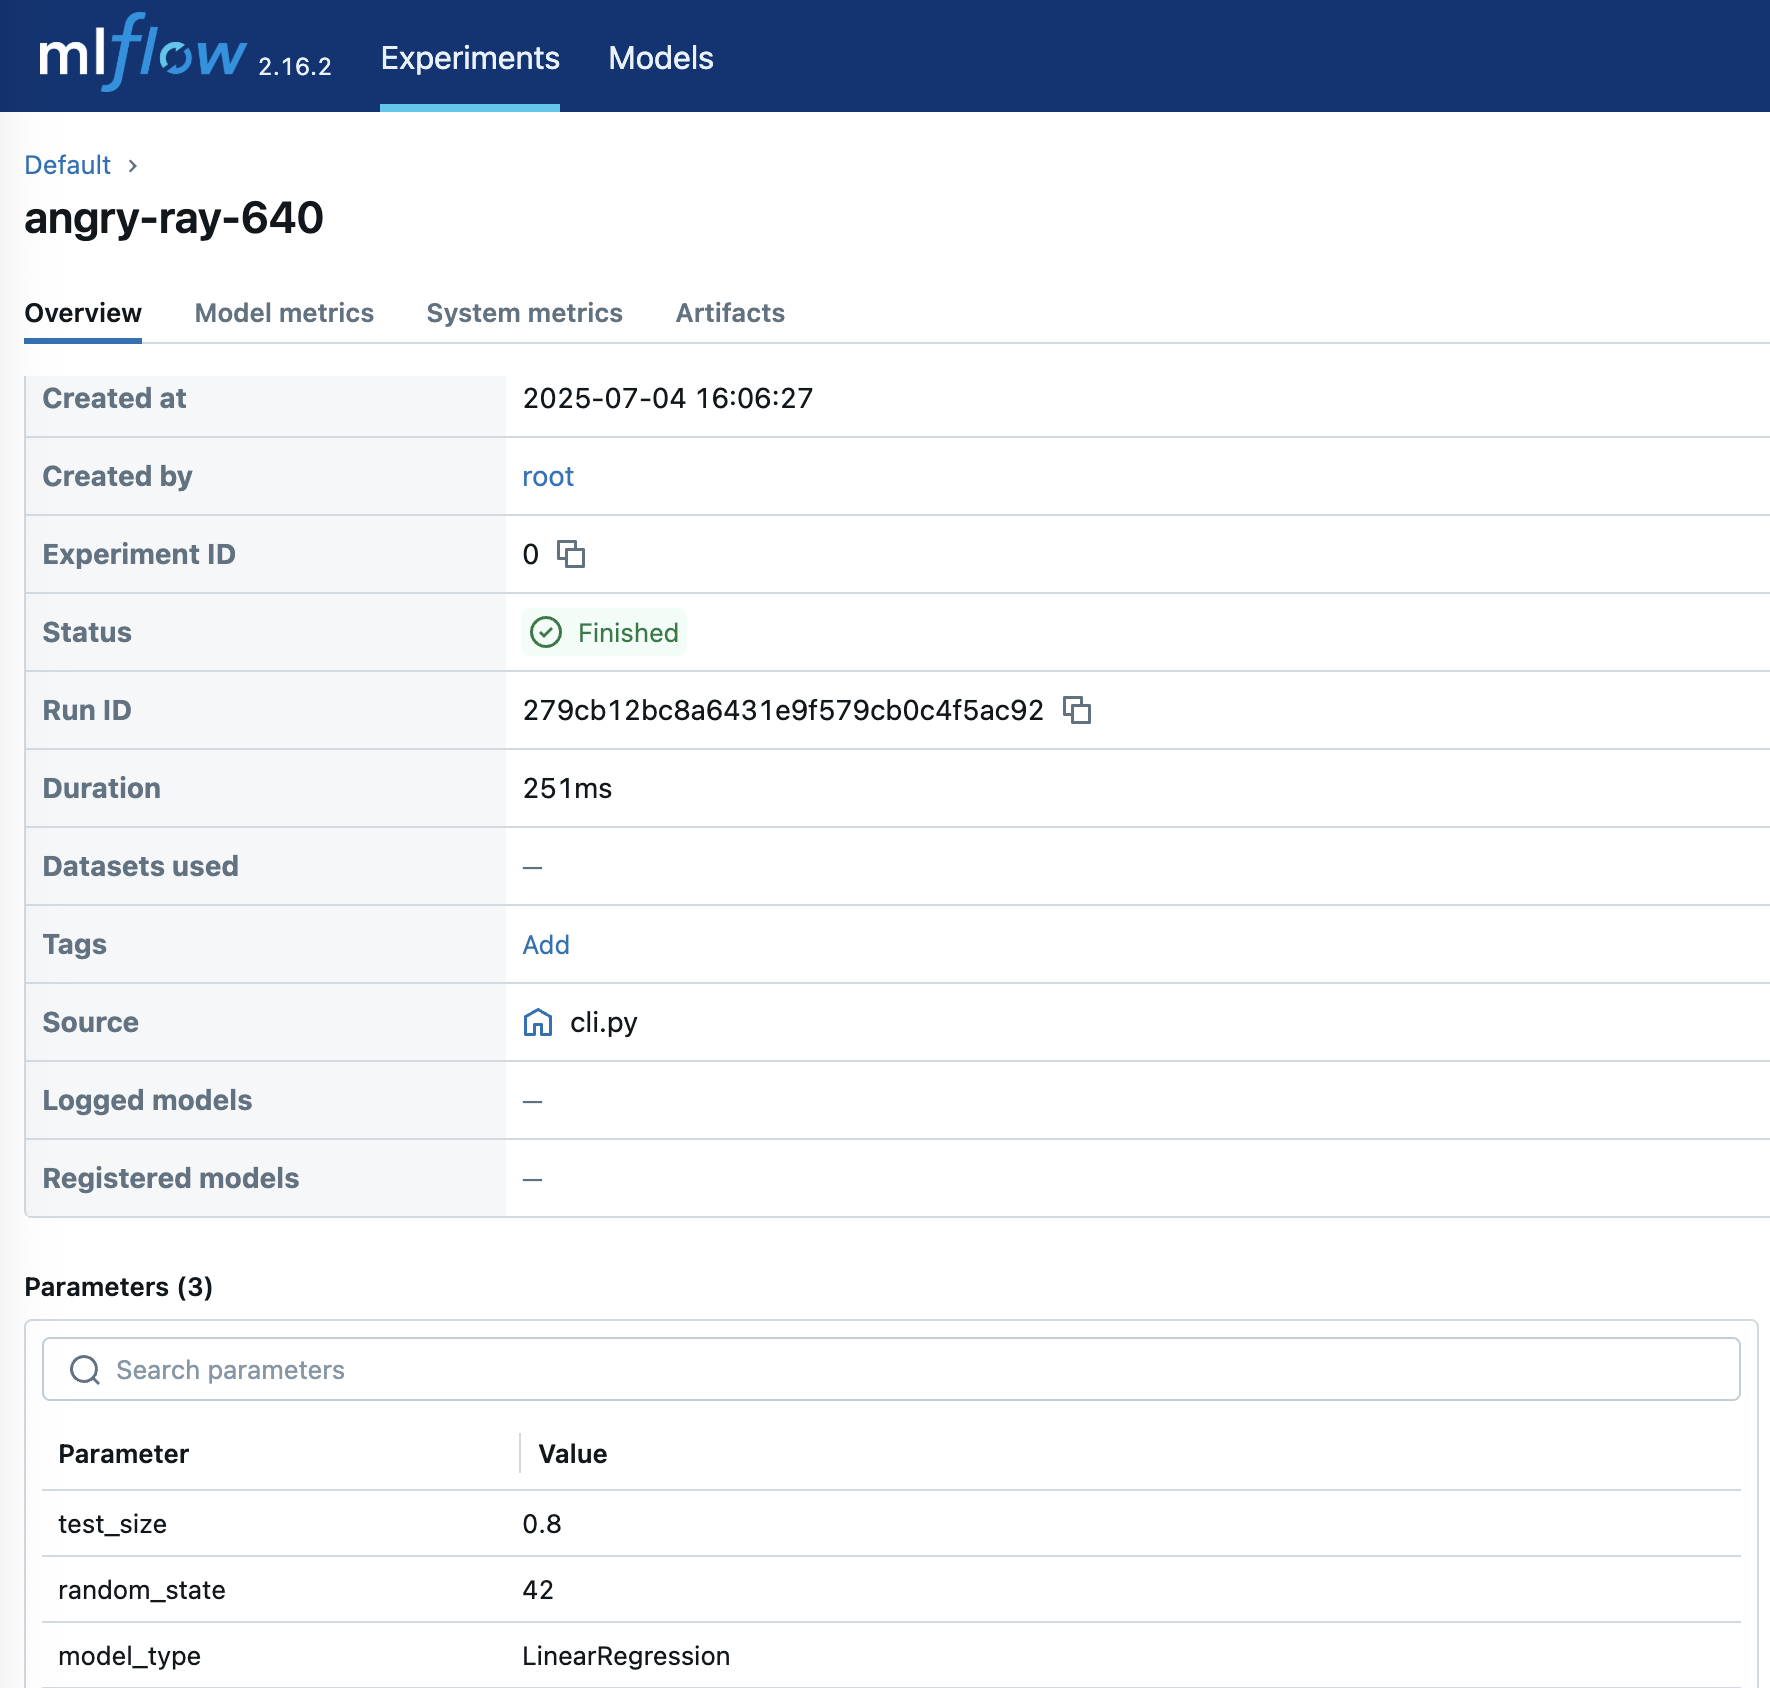
Figure 6: Experience detailed experiment insights
Clean up
Follow these steps to clear up the resources that we have configured in this post to help avoid ongoing costs.
- Delete the SageMaker Studio account by following these steps, this deletes the MLflow tracking server as well
- Delete the S3 bucket with its contents
- Drop the Snowflake notebook
- Verify that the Amazon SageMaker account is deleted
Conclusion
In this post, we explored how Amazon SageMaker managed MLflow can provide a comprehensive solution for managing a machine learning lifecycle. The integration with Snowflake through Snowpark further enhances this solution, helping to enable seamless data processing and model deployment workflows.
To get started, follow the step-by-step instructions provided above to set up MLflow Tracking Server in Amazon SageMaker Studio and integrate it with Snowflake. Remember to follow AWS security best practices by implementing proper IAM roles and permissions and securing all credentials appropriately.
The code samples and instructions in this post serve as a starting point – they can be adapted to match a specific use cases and requirements while maintaining security and scalability best practices.
About the authors
 Ankit Mathur is a Solutions Architect at AWS focused on modern data platforms, AI-driven analytics, and AWS–Partner integrations. He helps customers and partners design secure, scalable architectures that deliver measurable business outcomes.
 Mark Hoover is a Senior Solutions Architect at AWS where he is focused on helping customers build their ideas in the cloud. He has partnered with many enterprise clients to translate complex business strategies into innovative solutions that drive long-term growth.


![KAIZEN Locations & Map Guide – Boss, Chest, Weapon, Style [KASHIMO]](https://www.destructoid.com/wp-content/uploads/2026/02/kaizen-locations-and-map-guide.jpg)