


Accelerate protein design with BoltzGen on Amazon SageMaker AI
In this post, we demonstrate how to deploy BoltzGen on SageMaker AI and run an end-to-end protein design experiment. By the end of the walkthrough, you have a working setup that scales from quick validation runs to production batch processing. The setup offers two execution modes for different stages of research and uses step-level caching to reduce compute expenses during iterative workflows.
BoltzGen on Amazon SageMaker AI accelerates protein binder design by managing GPU compute infrastructure end to end. BoltzGen is a diffusion-based generative model that designs proteins and peptides capable of binding to specific biomolecular targets. A typical design campaign involves multiple GPU-intensive steps: backbone generation, inverse folding, structural validation, and candidate ranking. Running these steps across hundreds, thousands, or even millions of design candidates introduces operational overhead in provisioning instances, moving data between steps, and tracking costs. SageMaker AI manages this compute lifecycle from instance provisioning through result delivery and resource cleanup, so you can focus on design iteration rather than infrastructure operations.
In this post, we demonstrate how to deploy BoltzGen on SageMaker AI and run an end-to-end protein design experiment. By the end of the walkthrough, you have a working setup that scales from quick validation runs to production batch processing. The setup offers two execution modes for different stages of research and uses step-level caching to reduce compute expenses during iterative workflows.
This walkthrough applies to academic research labs, biotech startups, pharmaceutical R&D groups, and educational programs, whether you work in protein binder design, therapeutic protein engineering, or de novo protein architecture.
How SageMaker AI addresses protein design bottlenecks
Each step in a BoltzGen campaign runs on GPU hardware and processes one design specification at a time. On a 4-GPU instance (ml.g5.12xlarge), a campaign of 1,000 samples takes approximately 375 hours to complete, based on the repository’s benchmark data. Operating this infrastructure involves building CUDA environments (e.g. install CUDA driver and setup toolkit), coordinating GPU instance lifecycles, constructing data pipelines between steps, and recovering from failures in long-running jobs.
SageMaker AI addresses each of these bottlenecks directly. After you submit a job, SageMaker AI provisions GPU instances and executes BoltzGen inside the container. It writes results to Amazon Simple Storage Service (Amazon S3) and releases the instances when processing completes. Billing is per-second, so there are no idle GPU costs. A 2-hour design run on ml.g4dn.xlarge costs approximately $1.50 based on on-demand pricing.
The implementation supports multi-GPU parallelization within a single instance and multi-instance scaling across a pipeline. In pipeline mode, each step’s output is cached in Amazon S3 with a 7-day expiry, so when you iterate on filtering parameters, the design generation step that accounts for approximately 90 percent of compute cost does not re-run.
Setup scripts in the repository build the container and push it to Amazon Elastic Container Registry (Amazon ECR), and working examples let you submit your first design job within minutes. The same configuration that validates a design specification with 10 candidates scales to larger campaigns — only the parameter values change. Instance types ranging from ml.g4dn (lowest cost T4 GPUs) to ml.g6e (NVIDIA L40S GPUs) give you flexibility for matching throughput to budget.
What BoltzGen offers
BoltzGen is an all-atom generative model for designing proteins and peptides that can bind to a wide range of biomolecular targets. The model generates binder backbone structures through a diffusion process. It then uses an inverse folding model called BoltzIF to generate amino acid sequences and validates structures with Boltz2 folding predictions.
The implementation is available in the Boltzgen on SageMaker repository on GitHub. The repository includes setup scripts, both execution modes, multi-GPU and multi-instance scaling support, and a quick start guide.
Two execution modes
We provided two execution modes in our implementation, optimized for different stages of research, so you start with quick experiments and graduate to production workflows as needs grow.
SageMaker AI processing jobs provide direct batch execution for quick experiments. After submitting a job, SageMaker AI provisions the GPU instance, runs the container, and shuts down the instance when complete. A single Python script triggers the entire workflow, without multi-step orchestration. For early-stage work where the goal is to test design specifications before scaling up, processing jobs minimize setup time.
SageMaker AI Pipelines provide a 5-step orchestrated workflow with step-level caching, automatic scaling, and visual monitoring in SageMaker AI Studio. Production workloads benefit from parameter iteration without re-running expensive compute steps. Each step (design, inverse folding, folding, analysis, filtering) can be scaled independently, and cached results are reused when inputs have not changed.
Both modes follow the same workflow. The container from Amazon ECR runs on a provisioned GPU instance, BoltzGen processes the design specification, and SageMaker AI stores results in Amazon S3 before shutting down compute resources.
Getting started
To get started, you need an AWS account, a few tools installed locally, and an Amazon S3 bucket for your data. The following sections walk you through each prerequisite and then guide you through your first protein design experiment.
Prerequisites
Make sure you have an active AWS account with billing enabled and the AWS Command Line Interface (AWS CLI) installed and configured (aws configure). Verify that you have sufficient service quotas (for example, 1 for this walkthrough) for GPU instances (ml.g4dn.xlarge or higher) in your target AWS Region (such as us-east-1).
Next, create an AWS Identity and Access Management (IAM) execution role for SageMaker AI. Attach the AmazonSageMakerFullAccess managed policy, grant Amazon S3 read/write access to your data bucket, and grant Amazon ECR pull permissions for the BoltzGen container image.
On your local machine, install Python 3.11+ with pip, the latest Boto3 and SageMaker SDK (pip install boto3 sagemaker), and Docker for building container images. Finally, create an Amazon S3 bucket in your target Region:
Running your first protein design
For the most streamlined setup experience, we recommend Amazon SageMaker Studio or an Amazon SageMaker notebook instance. These environments come preconfigured with AWS credentials, the SageMaker SDK, and Docker support.
Launch SageMaker AI Studio
Start by opening SageMaker AI Studio, where you run the setup and experiment commands.
- Open the SageMaker AI console.
- Choose Studio from the left navigation.
- Create a new Studio domain (if one does not exist) or open an existing one, enable Docker Access through local mode using AWS CLI.
- Launch a JupyterLab space with an instance (for example,
ml.m5.2xlarge). - Raise quota limits for
ml.g4dn.xlargeandml.g5.xlargeprocessing job usage to greater than 0.
Clone the repository
Download the BoltzGen on SageMaker AI code, which includes setup scripts, both execution modes, and example design specifications.
Build and push the container image
Your container image packages BoltzGen with its dependencies and GPU drivers. Build it once and reuse it across experiments. Set your region and run the build script:
Configure AWS credentials
SageMaker AI needs your AWS account details to provision compute resources and store results in Amazon S3. Copy the environment template and fill in your settings:
Example .env:
Now you’re ready to run your first design job with two options:
Option A: Quick experiment with all steps in a single processing job:
You have 10 intermediate candidate designs to generate using the diffusion model, which are the raw backbone structures going through inverse folding, refolding, analysis and filtering. In practice, this number should be much higher like 10,000 to 60,000 for real runs. The final diversity-optimized output set has two designs. So out of the 10 intermediate designs, only the two optimized for both quality and sequence diversity end up in your output folder.
Option B: A more production-like workflow that orchestrates different steps in a pipeline.
Change to pipeline directory:
Create the pipeline:
Run with design specifications:
Check status (replace the Amazon Resource Name (ARN) with the execution ARN):
Download results
For processing job:
For pipeline:
The output directory contains several subdirectories. final_ranked_designs/ holds the top designs ranked by predicted binding affinity. intermediate_designs/ contains the generated candidate structures. metrics/ stores structural analysis data including root-mean-square deviation (RMSD) and contact scores. A job_metadata.json file records the complete job parameters and status.
The following directory tree shows the output structure from a run with --num-designs 100 --budget 10 against the 1G13 target:
BoltzGen automatically filters and ranks all generated designs. Each design must pass structural quality thresholds—including refolding RMSD below 2.5 Angstrom and balanced amino acid composition—before entering the ranking stage. In this run, 3 out of 100 designs passed all filters. The pipeline then ranks designs by a composite quality score and applies diversity optimization to select the final set.
The following table shows the top five designs with key metrics. Higher design_ptm and design_iptm scores indicate greater structural confidence and binding strength. Lower filter_rmsd indicates better structural accuracy after refolding, and higher delta_sasa indicates a larger binding interface.
| id | Rank | design_ptm | design_iptm | filter_rmsd | delta_sasa |
| 1g13prot_24 | 1 | 0.760 | 0.304 | 2.24 | 584.7 |
| 1g13prot_37 | 2 | 0.732 | 0.275 | 1.98 | 657.4 |
| 1g13prot_21 | 3 | 0.748 | 0.159 | 2.49 | 535.7 |
| 1g13prot_06 | 4 | 0.736 | 0.426 | 1.34 | 1598.0 |
| 1g13prot_59 | 5 | 0.763 | 0.527 | 1.05 | 2369.0 |
Each final design is saved as a .cif structure file with a rank prefix (for example, rank001_1g13prot_24.cif), ready for downstream analysis or experimental validation.
Now that your first experiment is complete, the following sections explore how BoltzGen on SageMaker AI works under the hood so you can optimize the architecture for your specific needs.
How it works
Understanding the architecture and scaling capabilities behind both execution modes helps you choose the right instance type and decide between single-instance and multi-instance configurations. It also helps you take full advantage of caching to reduce costs.
Architecture
With processing-job mode (single-step batch), SageMaker AI coordinates instance provisioning, container execution, Amazon S3 data movement, and cleanup after you submit your job. Your workflow follows these steps:
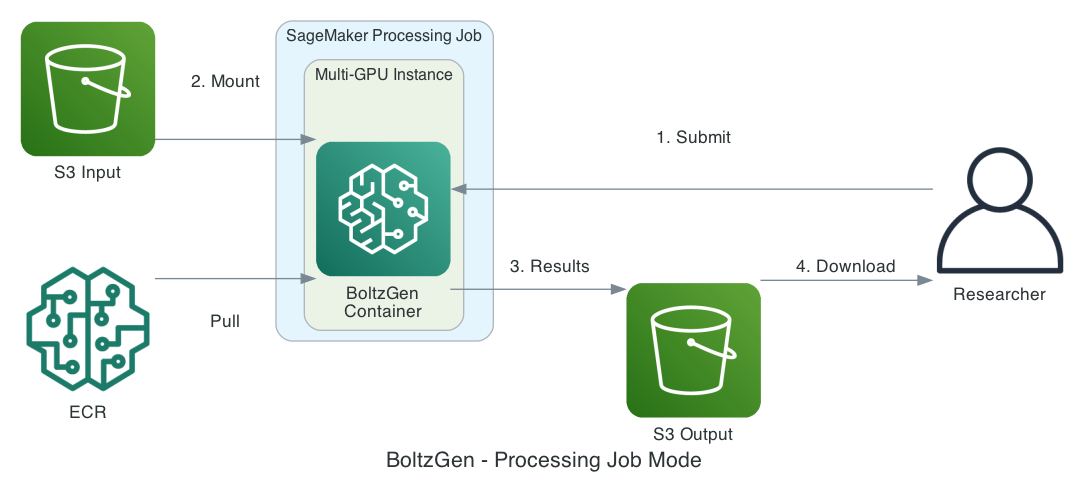
- Prepare a design specification (YAML) and reference structure files.
- Upload your files to Amazon S3. SageMaker AI mounts the Amazon S3 input data to your container.
- BoltzGen generates designs and writes results back to Amazon S3.
- Download your final results from Amazon S3.
In pipeline mode (5-step workflow), your pipeline runs five sequential steps, each of which you can scale separately:
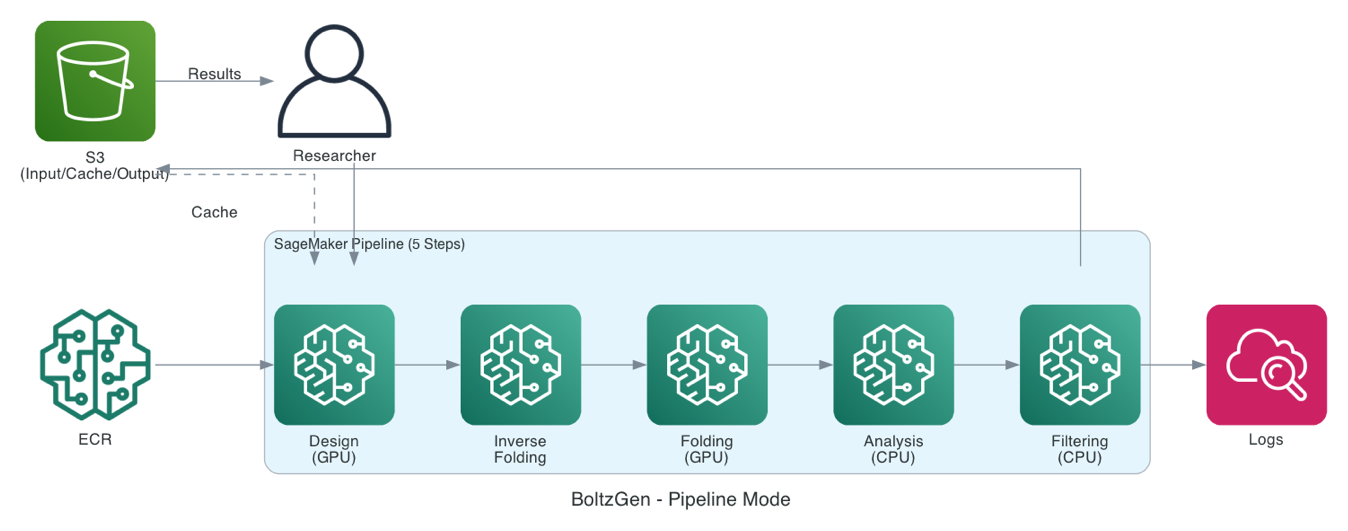
- Design (GPU): Diffusion model generates binder backbone structures.
- Inverse folding (GPU): BoltzIF generates amino acid sequences.
- Folding (GPU): Boltz2 validates complex structures.
- Analysis (CPU): Calculates structural metrics (RMSD, solvent-accessible surface area (SASA), and contacts).
- Filtering (CPU): Ranks and selects top designs.
Your pipeline caches each step’s output in Amazon S3 with 7-day expiry. When inputs haven’t changed, cached results are reused automatically, so when you iterate on filtering parameters, the expensive design generation step is skipped entirely.
Scaling across GPUs and instances
BoltzGen on SageMaker AI supports two complementary scaling strategies that help you balance cost and throughput.
Multi-GPU parallelization distributes design specifications across GPUs within a single instance through round-robin scheduling. Each GPU processes its assigned specifications independently using ProcessPoolExecutor (Python’s built-in parallel processing library), with thread-safe progress tracking through a ProgressTracker class. GPU detection is automatic through nvidia-smi.
For example, on an ml.g5.12xlarge instance with 4 GPUs, 10 design specifications are distributed as follows:
A single multi-GPU instance is more efficient than multiple single-GPU instances because BoltzGen loads approximately 5 GB of model weights. One multi-GPU instance avoids redundant model loading, reducing startup time and memory overhead.
Multi-instance scaling extends parallelism beyond a single machine. In pipeline mode, each step supports multi-instance execution. Work is partitioned automatically. For example, instance 0 processes the first half of specifications, and instance 1 processes the second half. Each instance then further parallelizes across its own GPUs.
Step-level caching
Pipeline mode caches each step’s output based on input hashes with a 7-day expiry. Because the design step accounts for approximately 90 percent of compute cost, caching provides substantial savings during iterative work. Changing only the filtering parameters triggers a rerun of only the filtering step, while cached design outputs are preserved.
Container, configuration, and implementation
Your Docker image (Dockerfile.sagemaker) is built on NVIDIA CUDA 12.2 with cuDNN 8. It includes Python 3.10, build tools (cmake, gcc), scientific libraries (HDF5, Boost), and PyTorch with CUDA 12.1 support. SageMaker AI maps standard mount paths: /opt/ml/processing/input for input data, /opt/ml/processing/output for output data, and /opt/ml/processing/cache for model weights.
Configure your pipeline through YAML files with environment variable substitution:
The syntax supports ${VAR_NAME} for variables loaded from .env and ${VAR_NAME:default} for variables with default values.
The core integration relies on the SageMaker AI ScriptProcessor class:
Intermediate results between pipeline steps are stored in Amazon S3:
On your first BoltzGen run, approximately 6 GB of model weights are downloaded from Hugging Face. The cache directory (/opt/ml/processing/cache) stores these weights, and subsequent runs in the same container reuse the cached models.
Cost optimization tips
Start small. We recommend testing with --num-designs 10 --budget 2 first to verify that your design specification works correctly before scaling up.
Match the mode to your stage. Processing jobs work well for quick experiments and validation. Pipelines suit production runs where parameter iteration benefits from step-level caching.
We recommend that you use caching. In pipeline mode, model weights (approximately 6 GB) are downloaded only on the first run, and step-level caching skips completed compute steps when inputs haven’t changed. Together, these two layers of caching save substantial time and cost during iterative workflows.
Clean up
To avoid ongoing charges after completing your experiments, delete the resources you created during this walkthrough.
Delete Amazon S3 data:
Delete Amazon ECR repository:
Delete Amazon S3 bucket (if no longer needed):
Delete AWS IAM role (optional):
Stop and delete the JupyterLab space if you followed the preceding instructions. SageMaker AI Studio spaces generate cost because they run on a dedicated instance, in this case an ml.m5.2xlarge instance. Stop the space from the Studio UI or the SageMaker AI console. You can also stop it by using the AWS CLI. See the instructions in the SageMaker AI documentation.
Conclusion
In this post, we demonstrated how to deploy BoltzGen on SageMaker AI, run your first protein design experiment, and scale from quick validation runs to production batch processing. Managed GPU compute, step-level caching, and per-second billing make it possible to move from a design specification to ranked protein candidates without managing infrastructure. Two execution modes let you match compute to each stage of research: processing jobs for quick experiments and pipelines for production workflows. Multi-GPU parallelization takes a single validation run to thousands of designs.
Next steps
To get started, visit the sample-biofm-quickstart repository on GitHub and follow the quick start guide for Boltzgen on SageMaker processing job. For more information about SageMaker AI processing jobs and pipelines, see the Amazon SageMaker AI documentation. We welcome feedback and contributions to the project. For questions about scaling protein design needs using SageMaker AI, reach out to an AWS representative.
Acknowledgments
We thank the BoltzGen team for developing this protein design model.


![KAIZEN Locations & Map Guide – Boss, Chest, Weapon, Style [KASHIMO]](https://www.destructoid.com/wp-content/uploads/2026/02/kaizen-locations-and-map-guide.jpg)